Thursday, July 23, 2015

Lessons Learned from a Conference Scavenger Hunt

GooseChase is a mobile platform that makes running scavenger hunts incredibly easy and exciting. Participants complete missions, receive points, and track progress on real-time leaderboards and photo feeds. GooseChase apps are available for download on iPhone and Android, but not Windows phone.  A very similar competitor is The Go Game.

The organizers of the March of Dimes 2015 staff conference decided to use GooseChase for all  attendees as a fun way to help staff get to know each other, and to engage with the mission.  I volunteered to assist from the administration side of the game, and below are some of my observations.

Lessons Learned

Mission setup

GooseChase recommends 30+ missions for a successful game.  When creating a mission a title, description and identifying the number of award points are the only required fields, although you can also add a photo and link to website.

Regardless of the duration of your event, you can continue to add and edit missions.  Our game was setup for 3 days, and we added 7 events each day.  There is NOT a way to pre-program when new missions begin (nor am I suggesting there should be), so we added new missions nightly.

While adding new missions certainly keeps the game motivation/excitement alive for a multiple day game, I think that starting with 7 missions was limiting.  My recommendation would be to take the GooseChase advice and start with 30+ missions from the start, and if you want to add more later, go for it!

One bit of advice I picked up from a YouTube video was that when you have >30 missions it can become difficult to scroll through the list.  One tip they offered was that if you do offer a lot of missions, to consider printing out a list of them, and numbering them so teams can quickly find them in the app's mission list.

Teams versus individuals


The pro's of this approach are that it makes the app registration process less confusing, and allows the organizers to identify individual contributions.
The con's are that you lose a lot of the team building benefits that could otherwise be achieved, and more importantly you have to pay for significantly more licenses.

We opted for individual registration.

Who is winning?

The leaderboard section of both the app and the desktop site allow you to see who has earned the most points.  The catch is that the only thing that displays is the team/individual name.  As an admin it would be helpful if you could see a full list of user information such as their email address, but I couldn't find that capability.

While doing a corporate event we assumed folks would use their names, instead we ended up with completely random gibberish which prevented us from being able to identify who was playing.  In hindsight, it would be well advised that you ask your users to adhere to a certain naming convention so that you can easily identify who is who (this goes for both team and individual games!).

Examples usernames from our challenge that proved unidentifiable:
  • GFN1906
  • ChicagoBabe3
  • GloryDaze
  • TrackyRed

Inclusion of those not in attendance

As mentioned, our implementation of GooseChase was for an invite-only staff conference, which is typically attended by around 35% of our organization.  Since the conference is not streamed and doesn't offer any remote participation, there was a suggestion that the game be modified to provide opportunities to include staff that weren't invited to the conference.  Ultimately it was decided that the GooseChase be focused on on-site participants to keep it as interactive as possible, but it might be worth considering how to include off-site participants in the future. 

Screenshots

The GooseChase app only allows you to utilize the camera from your mobile device, NOT your photo gallery.

Communication, promotion, participation

The March of Dimes staff conference attendees received a binder of conference materials upon registering.  Since I didn't attend the event, and wasn't involved in the promotion of our GooseChase event, I can't say what they received that informed them about the game, instructions on how to participate, or how much it was promoted in other ways (general sessions, posters, management, etc).

Out of 350 conference attendees (and an enterprise/unlimited license), only 40 attendees download the app, and 18 of those completed at least one mission.

Missions

Below are the missions we used and the number of participants in each.  Why am I providing this? When constructing our GooseChase we struggled to find ideas for what would be fun - so consider this us paying it forward!

Mission Participants
Adaptable: Is your glass half full or half empty? Take a picture of both,8
Bold: Embracing change takes courage, get bold.  Visit the tech bar before 3pm and write on the courage wall.6
Circle of Champions: Download the Circle of Champions logo, print and wear it proudly.3
Ding ding ding! We have a winner!: Put a dollar in the March for Babies bucket.8
Enable breakouts: ABT getting you down? During your morning breakout session, share a picture of your success during your beach task.4
Entrepreneurial: Create a new breakfast food or beverage idea and encourage others to try it too.4
Externally aware: Did you embrace the 30 day challenge and meet someone new? Share!4
Feeling Floridian?: Ask the hotel waiter for the Tipsy Turtle Cocktail or key lime pie dessert at dinner tonight, share a picture of your treat!8
Find a friend: Make a new friend on your dine around tonight.10
Going, going, gone: Get ready to win big! Find out about Mobile bidding for auctions and download the link to our 2015, 24 hour silent auction at the tech bar.  Once you've received it send a picture of your screen.9
Home improvement: On your water taxi ride to dinner, take a picture of the house with the best story.6
I <3 technology: Technology getting you down? Take a picture of yourself having a drink and telling us about it the tech bar at 6pm.9
I like turtles: It is sea turtle nesting season here at the Marriott Harbor Beach.  Find the 2 different nesting areas on the beach and take a picture of yourself in awe.9
I spy with my little eye: Where's FRED? Find him and take a picture sharing a cup of coffee at the tech bar.11
Long term focused: reflect on your time at the conference4
Look at me now: Search yourself in CRM8
Macro planner: Visit the tech bar and search within FRED to find out about the macro planning program.8
Mobile giving: (no description was provided)4
Nimble: team pyramid? leap frog? take a picture being in the right position for change.3
Paparazzi: Find in your program and document the NICU Family Support photo of the year.9
Publix: Find someone wearing an I Love Publix button4
Research: Look in your programs and take a picture of the 2014 National Ambassador, Aidan Lamonth.12
Say hello: Introduce yourself to a new volunteer and show it by photographing your two badges (should definitely be from different states)4
Spread the word: 1 in 10 US babies is born prematurely each year, pass a note to a hotel guest or employee and take a picture.8
Surgeon general warning: Find a picture of a smoke free zone/no smoking and take a picture.7
Whip it good: from 4:30-5:30 get inspired for your next Signature Chef auction and see what the hotel is cooking in the lobby.  Take a picture of yourself and the chef.6
You gotta be in it to win it: Use the tech bar and donate $1 to marchforbabies.org.  Then take a picture of the screen.  Note: You will NOT be able to donate from your mobile device and submit a screenshot that way.9

Wednesday, July 22, 2015

How March of Dimes Conducted a 30 Day Challenge for Culture Change

For the past year March of Dimes has been undertaking a major strategic realignment to improve our operational efficiency.

Part of the communication plan around the realignment project involved using a 30 day challenge to engage employees in “micro-actions” each day for thirty days. The goal of the challenge was to focus on helping the Foundation establish a more open environment for communication and problem-solving.

Setup

To help drive traffic we posted a widget in the upper right corner for the duration of the challenge which linked to an area of the site with a deeper explanation.
Intranet homepage


30 Day Challenge area

We chose to use a discussion forum to post each challenge in order to keep responses organized and to make it easier to track engagement.


Results

Forum...MayJune (month of challenge)
Hits2992,848
Visits1991,857
# Threads1637
# Posts23779
# Likes51958


Lessons Learned

30 Days: Calendar or Business?

Our first struggle with the task was the literal interpretation of "30 day challenge".
  • 30 business days
    • then should it just be called a 6 week challenge? 
  • 30 calendar days, including weekends
    • would staff really participate on a weekend?

Having already decided to kickoff the project in June, and call it a 30 day challenge, we went right down the middle and posted challenges on the 22 business days in the month (4 1/2 weeks).  In hindsight, this is something you probably want to put quite a bit of thought into well before your launch date and be extremely clear in your communications, because it was a source of confusion for our staff.

Tagging & Email Notifications

Our intranet software includes tagging capabilities where you can tag individuals or groups of users, and they are then notified via an email and system message on our site.

Using the challenge to promote this feature was a rare opportunity to educate staff on what had been an under-utilized tool. By the end of the challenge nearly every forum post included a tag to a users, department, or physical office location.

Email notifications, generated from tagging, helped keep daily challenges on everyone's mind and fostered a herd mentality where those tagged quickly joined the thread.


Example of one of our forum threads with a few tags, click to expand

Email Overload

Our intranet allows users to subscribe to entire forums, or to individual threads, and a thread reply triggers an automatic thread subscription.  I love these subscription features, but in heavily utilized threads, the quantity of emails can cause some staff to get frustrated.

From the start it would be recommended to provide clear instructions about any email subscriptions your system has and ways to handle overload.  We took this as an opportunity to educate our staff on how to utilize Outlook email rules to maintain an organized inbox - an invaluable lesson that many staff were unaware of.  We also provided opt-out instructions.

Gamification: Leaderboards & Badges

Let's face it, competition is fun. So why not post a leaderboard of your most engaged employees, departments, offices - or award badges to users upon passing certain milestone!

We didn't implement leaderboards because of concern about quality of engagement over quantity, and to be sensitive to those users that were taking part off-line.  In hindsight, I feel that a leaderboard would have been helpful and that its value trumps other concerns.

Load Testing

We weren't sure how many users would participate in our challenge, but assumed it would be a manageable enough number that our intranet platform would be able to keep up.  We were wrong.

On the second day of the challenge we noticed that we had the same number of posts as the first day - which seemed very unusual and soon after were informed that some users were unable to post.  It turned out that our software had an IE specific bug which was preventing the display of >72 posts.

How to get around this? When a thread reached 50 replies, we edited the thread and marked it closed.  This locked the thread, preventing additional replies. Then, we created a new thread, using similar title, and the same thread copy to capture additional responses.  Problem solved!

Challenges

Below is a brief description of the challenges we posted, and the amount of engagement they triggered.  Why am I providing this? When constructing our 30 day challenge we struggled to find ideas for what would make a good challenge - so consider this us paying it forward!

Day Challenge Responses
1say hello to one person you do not normally interact with72
2share with a colleague what you value about them72
3volunteer to do something that is out of your comfort zone, or normal scope of work28
4encourage those around you to think of themselves as part of a team51
5post one word that describes the team that you work with72
8complete an employee satisfaction survey42
9seek out a perspective different than your own by inviting a colleague, volunteer or partner to participate in a conversation or meeting, and seek out this person’s input and ideas on the topic being discussed20
10congratulate a colleague, volunteer or partner on a success26
11keep an open mind all day long16
12post one word that you feel best describes <the company you work for>60
15ask a colleague, volunteer, or partner, for their input on a problem or challenge you are facing19
16consider your team members involvement before making a statement that begins with “I”13
17redirect any conversation that becomes exclusive or siloed13
18share the title of a song that you think of when you think of your work team and the work you do together55
19share the Olympic sport, or event, that you think of when you think about <the company you work for> 29
22contribute to a culture of “yes” by maintain a positive attitude in all conversations or meetings19
23take 5 minutes and offer to help a colleague with whatever they need20
24provide encouragement to someone around you21
25describe your favorite “team” moment20
26share the tool (from a toolbox), that you think of when you think about your team of colleagues, volunteers and partners at <the company you work for>29
29have lunch with someone who you don’t interact with on a daily basis19
30what are you coming away from after 30 Days focused on open environment? do you and your team have plans to continue on the path towards a more open environment for communication and problem solving? 22

Here are additional challenges which we considered:
  • Fill in the blank (Mad Libs style)
    • Example: The company I work for reminds me of  _____ and inspires me to ______.
  • Share something you are looking forward to happening this year
  • Share something about yourself that most people don’t know
  • Share something funny (joke, picture, etc)
  • Share your favorite inspirational quote
  • Repeat one of the challenges that you especially enjoyed
  • Share your thought on the 30 day challenge – what worked well, what could have been better?
  • Take your 15 minute breaks and unplug on at least one of them – walk, stretch, meditate

Thursday, February 5, 2015

Automating the scheduled extraction of db data and FTP of it using SQL Reporting Services 2012

Our intranet team manages our relationship with Next Jump, an e-commerce company that manages employee savings programs for companies worldwide including 70% of the Fortune 500.

To login to their site, employee data must first be sent to Next Jump.  We could log into our intranet db server, open SQL, run a script, copy the data to Excel, then go to the vendor site to upload it...but I get bored by repetitive things so we've automated the process.

The following steps were necessary:
  1. Start SQL Reporting Service 2012
  2. Create a report project
  3. Subscribe to the report
  4. Implement a scheduled SFTP task 
Start SQL Reporting Service 2012

From the server you have SQL installed on, open SQL 2012 Reporting Services Configuration Manager and essentially clicking "Next" through each step.  You'll want to take note of the web service virtual directory, and the report manager site identification.  The default for them is:
  • http://<your server name>/Reports
  • http://<your server name>/ReportServer
At this point both of those URLs should resolve and give an indication that your Report Service is up and running.  If you are running into difficulties, this is a great article which helped me get it up and running: How To Configure SQL Server Reporting Services In Order To Deploy Reporting Services Reports In GP

Creating a Report Project
Getting this setup was relatively easy as I had done it previously, albeit on an older version of SQL (Creating a report from Oracle WebCenter Analytics db using SQL Reporting Services).
  1. From your Start button, open SQL Server Data Tools.  If this is your first time going through it'll ask you to select a format - choose Business Intelligence if you are just making reports.
  2. Select File > New > Project > Report Server Project, be sure to name the project at the bottom of the page.
  3. In the Solution Explorer right click Reports then choose Add > New Item > Report, be sure to name the report at the bottom of the page.
  4. Specify a data connection from the Report Pane by clicking New > Data Source.  Name and configure your source.
  5. Define your data set from the Report Pane by clicking New > Data Set.  Name the data set and enter your query.
  6. Add a table to your report by going to the toolbox, selecting Table and dragging it onto the Design area of your report.
  7. Add your data to the report table by expanding your data set in the Report Data pane and dragging/dropping your data elements into the table column headers.
  8. Toggle the report preview button to ensure your data connection is working and the table is displaying nicely
  9. Deploy your report to the web server by selecting Build > Deploy
I've greatly simplified the steps above.  For a more comprehensive explanation with pictures please refer to Create a Basic Table Report (SSRS Tutorial) on the Microsoft Developer Network.

Subscribe to the Report
Assuming a successful deployment, verify it by going to the virtual directory at http://<your server name>/Reports.
To subscribe to the report:
  1. From the home page select the report folder, then select the down arrow next to the report and select Subscribe.  This dropdown didn't appear for me in Firefox so I had to use IE.
  2. Select the Windows File Share delivery method and configure the report as necessary
  3. From the My Subscriptions link (top right of page) you can verify the subscription, when it was last run, and it's status.
Yay! The easy part is done!

Implement a scheduled SFTP task
From the brief research I did I came to the conclusion that FileZilla wouldn't work and that I would need to install http://winscp.net which has a command line option that would allow for scheduled SFTP.

The install is straight forward and there is plenty of documentation on how to use the tool from a command line or through other forms of programming.  What I found most useful was their page Schedule file transfers (or synchronization) to FTP/SFTP server.
  1. Start by installing WinSCP
  2. Open the client application and connect to your SFTP site.  You might want to save the connection for later testing.
  3. I'm on Windows 7, so I went to Admin Tools > Schedule Tasks then created a Basic Task
  4. For the action choose start a program ("C:\Program Files (x86)\WinSCP\WinSCP.exe")
  5. You'll need to point to a script file (.txt) which will open the FTP application, connect to the site, and transfer the file.  For the arguments area you'll need to point at this script using a command like: /script="\\<your share file path>\WinSCP_script.txt".  For testing you might want to prefix that with /console which will open a window to show you that it is working as intended.
  6. Next go and create the script file in the location you specified.  This is what mine looks like:
    # Automatically abort script on errors
    option batch abort

    # Disable overwrite confirmations that conflict with the previous
    option confirm off

    # Connect to SFTP server using a password
    open sftp://username:password@connectionSite.com/

    # File to upload
    put \\HQ\GeoffGarcia\Project\NextJumpExport\NextJump.xls

    # Closes all sessions and terminates the program
    close
    Run it all a few times to make sure it works without a hitch...and you're done!!!
    This might seem a little tricky if you haven't tried to create a SQL Report, use an FTP client, or write a script, but I hope this mini-guide will help you accomplish your goal!


Troubleshooting:
The second time I tried to implement this I couldn't get the console window to open or any other programs that I tried it with.  I deleted the task I had created and then recreated it and everything worked.


Monday, February 24, 2014

Ning Widget Padding

I'm playing around with Ning a little and am trying to take control of my padding and margins.
To help isolate styles I've set some basic background colors.  This helped me get a better handling on where all the empty-space was coming from and hopefully it'll help someone else out there.


Friday, January 10, 2014

Kentico CMS 7 Installation

Getting started materials:
Forums: http://devnet.kentico.com/Forums.aspx
Online documentation: http://devnet.kentico.com/Documentation.aspx
Support: https://www.kentico.com/Support
Client portal: https://client.kentico.com
Download: https://client.kentico.com/Download

Step 1: Download the installer

When I went to this area I was prompted with 2 options:
* Kentico CMS 7 & EMS
* Kentico CMS 7.0 classic installer for .NET 3.5

Use the Kentico CMS 7 & EMS option. Even if you don't have the EMS license, it won't matter. All the DLLs, code and modules are included with all licenses. The license key enables/disables features automatically. 

Step 2: Run the installer

The install process is fast and intuitive.  I've done a lot of software and installs and this is one of the best I've ever used.  The documentation is very clear and should answer any questions you have.  I'd encourage you to use the discussion forums if anything is unclear.
After the installer completes a sample site will open.  At the top of the page will be links to:
CMS Desk - the tool to edit your website: http://localhost/KenticoCMS7/cmsdesk/default.aspx
CMS Site Manager - the admin interface to your installation: http://localhost/KenticoCMS7/cmssitemanager/default.aspx
The default authentication to both sites is administrator/<blank>

Step 3: Register your license

Assuming you've already purchased Kentico, you'll need to visit the client portal to register your license.  Copy/paste your code into the serial number field and choose a site name.
Next you'll need to provide your domain name to generate a license key (on the same page).
Copy the license key and open CMS Site Manager.  Choose the licenses tab, click the "New Licenses" button and follow the simple instructions.

Step 4: Change the admin password

From CMS Site Manager select the Administration tab and Users from the side navigation.  Open the administrator account, then select the password tab and change the password.  While you are in the account you might want to change the admin email address also.

Monday, November 11, 2013

Interact-Interact v7 Widget Sizes

-- this is obsolete after the 7.2 launch which includes an increase amount of widget size options --

I'm just getting my feet wet with the responsive framework of Interact-Intranet v7 and the widget design challenges that go along with that. 

When our v7 instance loads, for a heart-beat we see a light-grey widget outline which quickly fills in with content.  It looks as though the canvas accommodates 4 vertical columns on the landing homepage and 3 on subsequent area homepages due to the side navigation consuming a column.

Click the image for a larger view


When I added the Twitter widget I noticed that while it looks good on my 1280x1024 monitor it doesn't fully display on my 1024x768 monitor (employee standard).  I could have guessed a few times and probably come up with a good size, but knowing the widget sizes and understanding how they work is pretty important so I thought I'd put in some due diligence.

To help me figure out common widget sizes, specifically for the smaller widgets, I typically create free text widgets that include a simple 100% x 100% table with a colored background.  Then I take a screenshot of what I'm looking at and use Paint to figure out the dimensions.  With v7 I've run into an issue embedding a table into the free text widget so I did the next best thing - inserted a square red image!  I initially used a 1278x990 image, but later scaled it down to 280x280 because of issues I was running into with spacing issues caused by the image being rectangle. 

Click the image for a larger view


Note: These test were done in IE10.0.  I found that using Firefox altered the widget sizes slightly (2px difference at both sizes w/o a title).

The next test I ran was to determine the impact of resizing on the content of an image.  For this I used a 1k x 1k image of horizontal and vertical lines.  The result is that the image appears to automatically resize based upon width.  Because the widget sizes are fixed and images are aligned to the top, the bottom of the image is cut off.

Click the image for a larger view

What does this all mean?

If you are going to use an image in a free-text widget you would be advised
to not include a title since the title seems to have priority and the image is secondary.  Additionally, titles can wrap depending upon the resolution the page is viewed at which can cause a fairly significant difference in the amount of image height that displays.

What happened to the Twitter widget?

In the end I settled on a Twitter defined widget size of 275px (height) which displays the full widget at 1280x1024 and enough of it at 1024x768.
Click the image for a larger view

Friday, July 19, 2013

Interact Intranet: Diagnosing problems with AD sync

From time to time you might notice issues with accounts in your intranet not properly synchronizing with your AD system.  If this is the case the first step is to contact support which will give you the fastest resolution to your problem.

If you are handy with SQL and AD you can try to identify the issue yourself by examining the AD sync logs which are stored in a table called UMI_audit.

This query will return any errors from the last two weeks:
    select * from UMI_audit where errormsg is not null
This query will identify any users that aren't configured to sync:
     select * from umi_person where sync = 0  

The most common issues we encounter with AD sync are accounts that have been orphaned as a result of incorrect expiration.

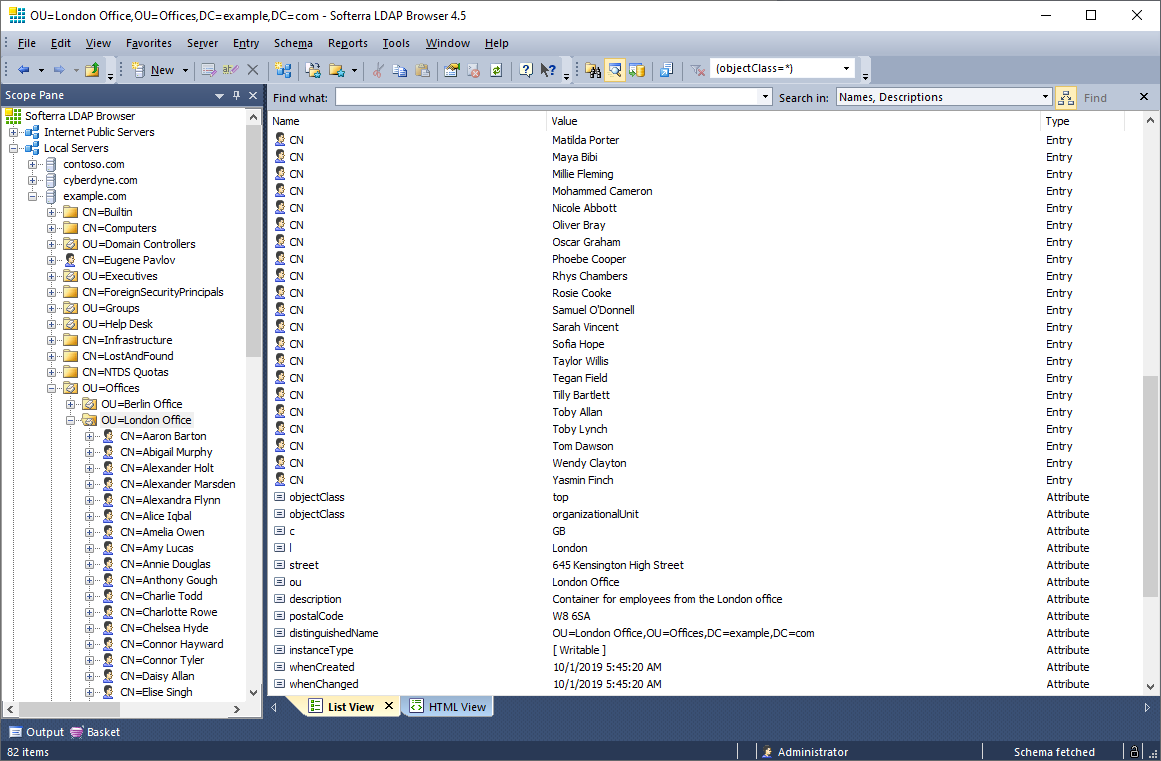
If your IT department isn't willing to give you AD access and you aren't sure how to verify data on the AD side, I'd recommend installing Softerra LDAP browser.  With a minute or two of configuration you'll have a READ only view into your organizations AD system.

Softerra LDAP Browser is a lightweight version of Softerra LDAP Administrator. It supports read-only operations that do not modify LDAP directory data, e.g. browsing, search, export, etc. For complete, fully functional management of LDAP directories you need Softerra LDAP Administrator.

Softerra LDAP Browser is the industry-leading software for browsing and analyzing LDAP directories. It provides a wide variety of features for handy viewing of directory contents, getting information about directory infrastructure and objects.

Right after the very first release Softerra LDAP Browser has become a real breakthrough in IT market thanks to its simplicity and power in equal measures. The software holds highest positions for 10 years already. Some of its features are unique - to date there is anything to match their efficiency in the existing LDAP software packages.